Sunday, 22 January 2012

Fabric Diary Cover

Being fed up of the same old hard back diary cover each year I decided to personalise it this year and make something different.   I found a wool scarf in a charity shop and used this as my base for 2012's diary. It also gave me an opportunity to use my new sewing basket I had for Christmas, I had to add the picture!


First you need to place your hardback diary on to the scarf and draw around it with tailors chalk leaving a 2.5" gap at each end to fold in to the cover to hold the diary in place and a 1cm gap on the top and bottom.

Next you need to pin around all the edges ready to sew on the machine, then carefully  sew these into place using thread which can either be the same colour or like I have used a contrasting colour.


Fold this around the diary as below to see if you are getting a good fit and make 2 small stitches around the top and bottom of each fold ready to fix into place with a blanket stitch.


Then the blanket stitch!  Go around the diary with a similar or contrasting thread to create a neat and cosy looking cover.  You also need to cut out a heart and do the same around the outline of the heart before you secure onto the diary.


Finally you need to pin the heart into place on the front of the diary cover before stitching into place from the back of the diary cover.


and there you have it, your very own diary cover.   Thank you for reading and catch me next time for some bakery.  Lemon and poppy seed muffins!   Until then....

TTFN

Stephanie x


Tuesday, 17 January 2012

Jam + Cath Kidston = Cute Cottage Style Preserves & New Year Enthusiasm.

I had to post these wonderful labels I received as a gift for Christmas, they are so cute and are great to make your preserves into a gift for a special friend or relative. Or just to make you feel even more excited about making jam.   I read in a book recently that making preserves evokes deep-rooted, almost primeval feelings of self-sufficiency and survival!   A notion which really interested me, do I just enjoy making jam or is it somehow in our blood, from the hunter and gather within us, waiting to be unleashed again?   Or is this all a bit too much?  

Either way I started the new year by stocking up on some new and some recycled jam jars and bought in a Kilo of Cherries ready to perfect my Cherry Jam after a rather disappointing disaster before Christmas.  They turned out rather well they just need a little more lemon juice and a little less cooking time, think its a matter of getting used to the new maslin pan!   The best bit was decorating them in these adorable Cath Kidston Jam labels I had as a gift for Christmas.  Don't they give you that cottagey traditional jam look?

I will be attempting some more preserves soon, traditional Seville marmalade next, trying to follow the seasons this year, although I need to find the elusive fruit first! I will be attempting some sewing projects too, next is the wooden mini bureau which I will be redecorating into a jewellery/storage box with fabric draws and buttons, this will become clearer when posted I promise!  I also made myself a diary cover on the weekend which I will be uploading on, if not before the weekend so stay tuned for that too.  I have also finally after 4 weeks of waiting tried my coconut soap, and it lathers up a treat, please try it and see what you think, its really moisturising.

I am considering selling some of my crafts this year, I am put off with the amount of people who don't think its worth the trouble but if I only make a few pounds here and there, then that's that, its worth a try.  I would be really interested in anyone's hints and tips if they have had any success or any inspiration stories of Friends of friends for example, please let me know.

So until then thank you for reading and I will be posting the diary cover project soon and starting my hunt for that Seville Orange.

Stephanie x

Wednesday, 4 January 2012

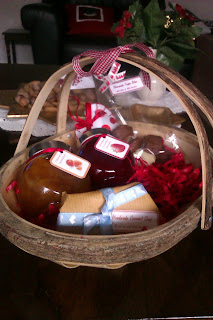
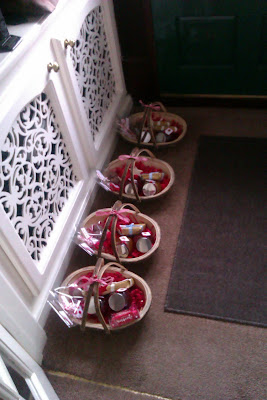
Ok, so finally the finished hampers!

So after a lot of hard work and panic, I finally finished the Christmas Hampers.  You know what though, I really enjoyed doing them.   I have lots to practise and learn and even though I have received 100% positive feedback on the hampers I cant help but feel I want to perfect everything in here so I can maybe,  just maybe! Make some money out of them next Christmas.

I delivered them Christmas Eve and as I went around in my car, listening to Christmas Music I delivered them to friends and family and it was the perfect start to Christmas week. 

I am going to spend the next year perfecting my jam recipes and getting to grips with my sewing machine.   I did not produce the quality of fudge I was hoping for and have decided not to let the fudge making process beat me, so this will be practised too.   Despite the hard work I enjoyed making these hampers so much and actually miss the stress of working with my crafts to the deadline so I am starting this week by getting some preserves ready.    I received the most wonderful Cath Kidson Preserve labels for Christmas so I am really keen to use these.  I will post a photo of these once everything has been done.  

So for now Happy New Year and here are some photos of the items in the Hampers, Minus the fudge of course which turned into 'White and Milk Chocolate Fudge Bites' as I was unable to get the setting as firm as I needed.

Steph x


Clementine Marmalade!

This was an experiment, I tried to make something a bit different.  I wanted to make a marmalade and after looking everywhere for Blood Oranges to make ruby red marmalade I gave up and tried something more Christmasy.  Clementine Marmalade.

Without really having a recipe I chose to make this more like a jam rather than a traditional marmalade and it turned out fairly well.  The segments where quite firm and I think my mistake was leaving it go slightly past setting point, but over all a tasty jam which went down well in my hampers.

The Jam Stuff!
800g of Clementine Segments (Not the peel)
240g Jam/Marmalade Sugar with added Pectin
500g Golden Caster Sugar
4 Lemons (Keep Pips)
Maslin Pan or Heavy Bottomed Saucepan
Potato Masher
Wooden Spoon
Jam Jars ( 6 x 200ml were used)

The Recipe

Put a small plate in the freezer ready to test for setting point in the jam.

Start by Pouring boiling water from the kettle into each jar to leave for a few minutes.  Do the same over the lids in a bowl.   Once the jars have sat for a few minutes empty them and put them into a low oven to dry while you make the jam.

Peel all the clementines until you have 800g of segments (mmm the smell of Christmas comes out here, smells amazing!)  You need approx 8-10 Clementines.

Put them into your pan and start the heat to release some of the juices.  Add half the caster sugar and mash down into the pan whilst trying to release as much of the juice as you can.  Leave for 5 minutes and add the rest of the sugar's and lemon juice and stir well.

You also need to save 10-12 pips from the lemons and pop them into an empty teabag, tie securely with a piece of string and pop this into the pan and bring to a rolling boil.   The pips have lots of pectin in them so will help the marmalade reach setting point.

The recipe takes about 10-15 minutes, be careful when waiting for setting point as I was just waiting for the liquid to thicken which meant that the segments has passed their setting point and were quite firm but overall this was a lovely tasty marmalade and my friends and family have enjoyed it.

Bottle up when its finished with your prepared jars and soon when I see those Seville's I will be making a more traditional marmalade.   And if I ever find those Blood Oranges I will be making the ruby red marmalade too.  

Steph x

Monday, 2 January 2012

Strawberry & Vintage Cava Jam.


I wanted to make a lovely strawberry jam, because if you make jam, you need to be able to make strawberry don't you?  I really wanted to make a Delicious but different jam which my friends and family would looking forward to trying.   And Delicious this was, and it has also been my most flavoursome jam according to by samplers.

The Jam Stuff!
1kg of Strawberries (Once hulled this measured 800g)
375ml of Vintage Cava or Champagne
430g Jam Sugar with added Pectin
410g Granulated Sugar
110ml Lemon Juice
Maslin Pan or Heavy Bottomed Saucepan
Potato Masher
Wooden Spoon
Jam Jars ( 6 x 200ml were used and 2 x 30ml)

The Recipe

Put a small plate in the freezer ready to test for setting point in the jam.

Start by Pouring boiling water from the kettle into each jar to leave for a few minutes.  Do the same over the lids in a bowl.   Once the jars have sat for a few minutes empty them and put them into a low oven to dry while you make the jam.

Start the jam by putting 240g of the strawberries into a heavy bottomed pan and bash down with the potato masher over a medium heat. Add approx half of the granulated sugar and stir and bash until you create a nice thick sauce which will help the rest of the jam develop, it will take about 5minutes.

Next you need to add the rest of the sugar, the rest of the fruit and the lemon juice and stir until all the fruit starts to break down in the pan.  As soon as you can see this happening you can add the Cava or Champagne to the mix and keep stirring until the recipe starts to thicken.  Keep the mix at a medium to highish heat and look for a rolling boil.  The rolling boil is the point when the jam is able to reach the temperature which will aid setting point.

I was mesmerised by the dark thick crimson colour in the pan as the recipe got nearer to setting point.  I am not sure if it was the Cava creating this or just the strawberries.  As I looked into the pan the bubbles looked like small twinkling starts in a deep red sky.  It was beautiful without sounding too ott.  I tried to take a picture and I got this.... Although it doesn't do it justice to what it was like in the pan.

The jam needs to cook for around 12 minutes before it reaches setting point.  This batch took me about 17minutes.   So I tested it but putting a small teaspoon onto the plate out of the freezer, leaving it for a minute. When it crinkled when I pushed my finger through the sample jam I knew it was done.

Then I poured it into my sterilised jars and created a wonderful set of Strawberry jams for my Christmas hampers.  The recipe made 6 x 200ml Jars and 2 x30ml jar.

There is not a strong taste of Cava in this jam but the use of the Vintage Cava gave the strawberries a really special taste.  Sometimes strawberry jam is very sweet and the Cava took some sweetness out of this while allowing the strawberry taste to taste their best.

I hope you enjoy it.

Steph x